Balustrade Installation
Guide
Installing a balustrade system requires precision, planning, and the right tools to ensure both safety and a flawless finish. Whether for balconies, terraces, staircases, or decking areas, following the correct installation process is essential for durability and compliance.
Planning & Preparing for Installation
Before installation, make sure:
- All materials are delivered and inspected for damage
- Installation area is clean, level, and structurally sound
- You comply with local building regulations
- You have all required tools and safety equipment
Typical tools include:
- Measuring tape & level
- Drill machine & anchors
- Rubber mallet
- Glass suction lifters
- Screws & stainless steel fittings
- Silicone sealant
Proper preparation helps avoid costly mistakes and ensures a smooth installation process
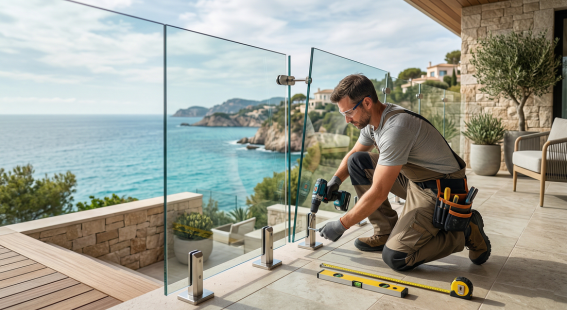
Step 1: Site Assessment & Planning
- Identify installation area (balcony, staircase, terrace)
- Measure total width and height
- Check surface material (concrete, wood, steel)
- Mark fixing positions
Accurate planning is critical because incorrect measurements can lead to alignment issues and unsafe installation
Step 2: Marking & Layout
- Mark the centerline of the railing
- Define positions for glass panels or posts
- Ensure equal spacing between panels
- Double-check alignment using a level
This step ensures a clean and symmetrical finish.
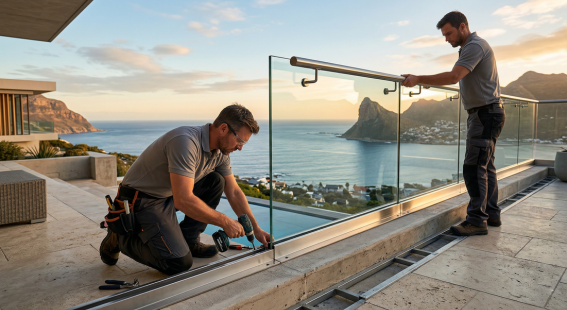
Step 3: Install Base / Posts / Channels
Depending on your system:
Frameless System (U Channel / Base Channel)
- Drill holes and fix the base channel
- Insert expansion bolts
- Ensure proper leveling
Post & Clamp System
- Install vertical posts securely
- Maintain equal spacing between posts
Strong base fixing is essential for structural safety.
Step 4: Position Glass Panels
- Place rubber setting blocks inside channels
- Lift glass panels using suction lifters
- Carefully insert glass into position
- Maintain equal gaps between panels
Glass should never touch hard surfaces directly to avoid damage
Step 5: Alignment & Adjustment
- Check vertical alignment using a level
- Adjust panels for consistent spacing
- Tighten all fixings securely
Even small misalignments can affect the final appearance significantly
Step 6: Fixing & Securing
- Install clamps, gaskets, or wedges
- Secure glass firmly in position
- Apply silicone sealant where required
This step ensures stability and weather resistance.
Step 7: Install Handrail (If Required)
- Measure and cut handrail sections
- Fix on top of glass panels
- Ensure smooth joints and secure connections
Handrails provide additional strength and safety.
Step 8: Finishing & Sealing
- Apply finishing caps or trims
- Seal joints and edges
- Clean glass panels thoroughly
Proper sealing protects against water and environmental damage.
Step 9: Final Inspection
- Check all fixings and stability
- Ensure panels are aligned
- Verify compliance with safety standards
A final inspection ensures long-term performance and safety.
Important Safety Tips
- Always use toughened or laminated safety glass
- Wear protective gloves and footwear
- Never force glass into position
- Use professional installers for complex projects
Need Help?
If you are unsure about installation, we recommend contacting our expert team for professional assistance to ensure a safe and perfect result.